Syntax highlight anything with Tree-sitter
Posted by Simon Larsén in Programming
As of my previous post on extending NeoVim for commenting and uncommenting code blocks, I'm on something of a NeoVim extension streak. The flavor of the week is syntax highlighting. I've been using the highly customizable nvim-treesitter for the past few years. This depends on there being a Tree-sitter parser for whatever language you're working with. Usually there is, but sometimes you run into languages that are esoteric enough that there aren't any parsers available. And then you're SOL on the whole syntax highlighting part. Unless, of course, you write a parser of your own. Which naturally is what we'll do.
This is the first article in a series on working with Tree-sitter to syntax highlight anything. Although this article series is intended for a NeoVim-inclined audience, this first part has nothing to do with NeoVim and can be enjoyed by anyone interested in Tree-sitter or parsers in general. In the still under construction second part, we'll dive into working with and utilizing Tree-sitter in NeoVim.
Companion repository: The complete parser developed in this article is available in a companion repository at slarse/tree-sitter-mds
What's this Tree-sitter thing?
Tree-sitter is a parser generator tool for the modern era. What's a parser generator, you ask? Well, it's exactly what it sounds like: a tool to generate a parser! By defining the syntax of a language in a way the parser generator understands, it can generate a parser for you that can take source code of that language and transform it into a syntax tree.
Parser generators aren't a new concept. GNU Bison has been around for 38 years at this point, and YACC had been around for a decade by the time Bison arrived. So, not at all a new concept. What's novel with Tree-sitter is both how easy it is to define a grammar as long as you know a little bit of JavaScript and the fact that syntax highlighting is a built-in feature.
You can do a lot of cool things with Tree-sitter's syntax trees, but in this article our focus is on syntax highlighting.
This article assumes that you have access to a
bash-like shell (such asbashorzsh). Commands intended to be executed in a shell are prefixed with$. Lines that follow a$-prefixed line but are not prefixed are output lines.
Working example: Markdown Simple
As a driving example for this article series, we'll look at a tiny subset of Markdown, which should be familiar to most anyone in the target audience. Specifically, we want to be able to highlight the following containing headings, paragraphs, inline code and code blocks.
# This is a heading
This little paragraph of text with `inline code`

```
const words = ["javascript", "code", "highlighting"];

for (const word of words) {
    console.log(word);
}
```

# This is another heading
Another paragraph with a # in the middle.
Store these sample file contents in test.mds for later use!
I call this subset Markdown Simple and choose to write it in files with the
.mds file extension. At the end of this article, we'll have fully functioning
syntax highlighting for .mds files, including properly highlighted JavaScript
code in the multiline code blocks!
Getting started with creating Tree-sitter parsers
Tree-sitter's docs have a good Project setup section, but I found that it lacks a few key ingredients for our purposes. I will offer an augmented version here.
As a pre-requisite, you must have decently up-to-date versions node and npm
installed. With that, we can get started creating a project directory.
$ mkdir tree-sitter-mds
$ cd tree-sitter-mds
$ npm init
The npm init command will prompt you for a bunch of stuff. If you don't know
what to choose, just go with the defaults, it hardly matters for the rest of
this article. Now, you need the tree-sitter-cli application, which you can
also get with npm.
$ npm --save-dev tree-sitter-cli
Then setup a configuration file for tree-sitter-cli.
$ npx tree-sitter init-config
Note where the configuration file is written to. You may need to edit it later for your project to be located by Tree-sitter.
Baby's first grammar rule
As previously mentioned, a parser generator reads a grammar that defines some
language and spits out a parser for it. In Tree-sitter, we define grammar rules
in JavaScript, in a file called grammar.js in the root of your project. It
should have the following structure.
module.exports = grammar({
  name: 'markdownsimple',

  rules: {
      // grammar rules go in here
  }
});
If you now try to generate a parser you should get an error about there not being any rules.
$ npx tree-sitter generate
[stdin]:409
    throw new Error("Grammar must have at least one rule.");
Let's define a very simple grammar just to be able to parse the file.
rules: {
    source_file: $ => $.text,

    text: _ => /(.|\n)+/,
}
Put the above rules into your grammar.js file and then generate and run the
parser.
$ npx tree-sitter generate
$ npx tree-sitter parse test.mds
This should produce a simple syntax tree.
(source_file [0, 0] - [13, 0]
  (text [0, 0] - [13, 0]))
Let's dissect the grammar in detail so we can improve the syntax tree
granularity. The root node is the source_file. Every syntax tree is rooted in
this node, and there is only one of them for each parsed file. The rule
definition may look a bit strange at first sight.
source_file: $ => $.text
Any non-trivial grammar is built by composing rules. Any rule that references
another rule is a so-called
non-terminal.
The above rule says that the source_file consists of precisely one text
node. So source_file is a non-terminal that references text.
We then define the text rule using regex.
_ => /(.+|\n)/,
This regex just captures any character (.) or line feeds (\n). As the rule
does not reference any other rules, it is a so-called
terminal.
Note: Tree-sitter supports
LR(1)grammars, which limits the kinds of regex expressions that can be used. The finer details of this is beyond the scope of this article.
In summary, our grammar currently defines a source_file as a single text
node. Of course, we could immediately define source_file as the regex that
currently resides in text at this point; I just wanted to illustrate the
concept of terminal and non-terminal rules as it will become important in the
next part.
Let there be color
The goal of this article is to achieve nice syntax highlighting, so let's get
started immediately. We can highlight a file using the highlight command,
but it won't work out of the box.
If you run the below command, you should get an error message.
$ npx tree-sitter highlight test.mds
No language found for path `test.mds`

If a language should be associated with this file extension, please ensure the path to `test.mds` is inside one of the following directories as specified by your 'config.json':

  1. /home/slarse/github
  2. /home/slarse/src
  3. /home/slarse/source
  4. /home/slarse/projects
  5. /home/slarse/dev
  6. /home/slarse/git

If the directory that contains the relevant grammar for `test.mds` is not listed above, please add the directory to the list of directories in your config file, located at /home/slarse/.config/tree-sitter/config.json
To resolve this we need to add some information to package.json. Put the
following in there.
Tip: It's easy to break the
package.jsonfile with a misplaced comma. To ensure that you don't break the syntax ofpackage.json, runnpm iuntil it doesn't complain anymore.
  "tree-sitter": [
    {
      "scope": "source.markdownsimple",
      "file-types": [
        "mds"
      ],
      "highlights": [
        "queries/highlights.scm"
      ]
    }
  ],
Now run the highlight command again. If you get the same error as before,
you need to add the directory that contains you project's directory to
Tree-sitter's config.json file. For example, my project is located in
/home/slarse/projects/tree-sitter/tree-sitter-mds, so I add the path
/home/slarse/projects/tree-sitter to the list of paths at the top of
/home/slarse/.config/tree-sitter/config.json.
With that fixed, you should get a new error.
$ npx tree-sitter highlight test.mds
Failed to read query file "queries/highlights.scm"

Caused by:
    No such file or directory (os error 2)
This means your project was correctly located. We now need to define queries
for our highlight. Queries allow us to select nodes in the syntax tree and
assign pre-defined semantic meaning to them. Put the following content in the
file queries/highlights.scm in your project directory.
(text) @string
I won't go into detail on queries in this article. You can find all captures (e.g.
@string) available over here, and you can read more about queries as a whole over here.
This says that any text node should be considered a string. Running the
highlight command again, you ought to get some colored output.
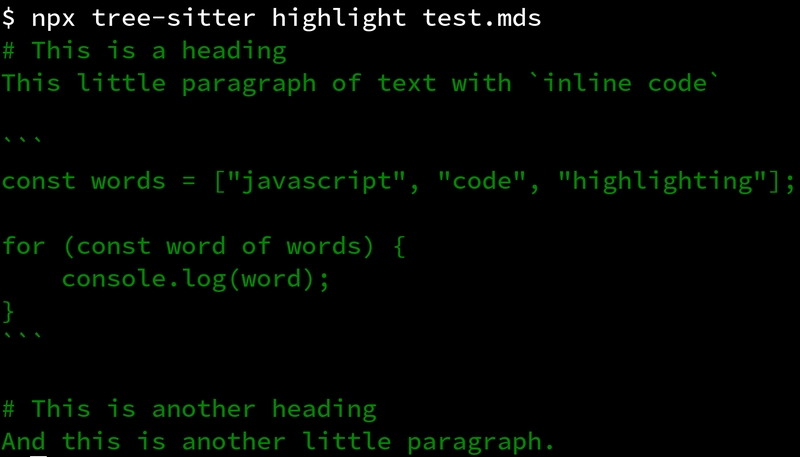
Not all that impressive; as all nodes with any content are text nodes
everything is just highlighted as a string. In my Tree-sitter configuration
the string color happens happens to be a shade of green, but it may be
different for you. For more granular highlighting, we need a more granular
syntax tree to perform queries against.
Refining the grammar
The basic pieces of the puzzle are now in place. We have a rudimentary syntax
tree allowing for an equally rudimentary syntax highlighting. It's now time to
start refining the grammar to capture different components. With some crude
annotations in (), we want a structure like this.
(section)
# This is a heading (heading)
This little paragraph of text with `inline code` (paragraph (text) (inlineCode (codeText)))

``` (codeBlock (codeText))
const words = ["javascript", "code", "highlighting"];

for (const word of words) {
    console.log(word);
}
```

# This is another heading (heading)
And this is another little paragraph. (paragraph (text))
Let's start off only with capturing the additional section and heading nodes
with new rules.
rules: {
  source_file: $ => repeat($.section),

  section: $ => seq(
    $.heading,
    repeat($.text),
  ),

  heading: _ => /#.+/,

  text: _ => /(.|\n)+/,
}
Our non-terminals source_file and section bring in ways of composing rules
with the repeat() and seq() composers. repeat(rule) means "repeat rule
zero or more times, while seq(rules...) means "match these rules in this
order". So a source_file node is zero or more section nodes, and a section
node is a heading followed by zero or more text nodes.
Generating and running the parser again, this lands us with a slightly more granular syntax tree where we separately capture the section's heading.
(source_file [0, 0] - [13, 0]
  (section [0, 0] - [13, 0]
    (heading [0, 0] - [0, 19])
    (text [0, 19] - [13, 0])))
Clearly there's a bug here: we only have one section, yet our source file
contains two. The reason for this is that text is too liberal, it captures #
characters anywhere on the line. We must adjust the regex to disallow #
directly after line feeds.
text: _ => /([^#]|[^\n]#)+/,
Here we say that text is either not a #, or it's a non-linefeed character
followed by #. Generating and parsing again we should now have our basic
section structure mapped out.
(source_file [0, 0] - [13, 0]
  (section [0, 0] - [11, 0]
    (heading [0, 0] - [0, 19])
    (text [0, 19] - [11, 0]))
  (section [11, 0] - [13, 0]
    (heading [11, 0] - [11, 25])
    (text [11, 25] - [13, 0])))
Great! We can now also adjust the query in queries/highlights.scm to only
highlight headings.
(heading) @string
This should land you with the following highlighting.
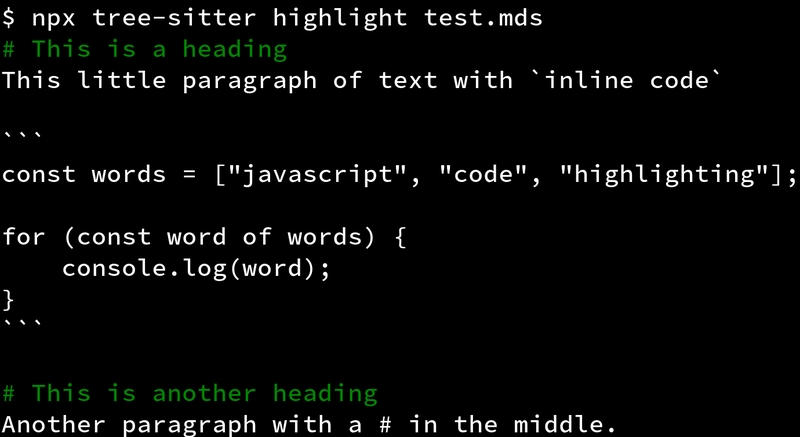
Nice!
Capturing inline code and code blocks
The only thing left for us to capture is inline code and code blocks. This is however where it starts to get a little bit complicated, so let's take each of these in turn.
Capturing code blocks
Code blocks are relatively simple to capture in isolation. A rule for code blocks could look as follows.
codeBlock: $ => seq(
  '```',
  $.codeText,
  '```',
),

codeText: _ => /[^`]*/,
We could inline codeText into the codeBlock, but making it a separate rule
will make it easier for us to highlight the content of the code block without
affecting the backticks around it. Note that codeText is not quite the same as
text; the former allows any zero or more characters except for backticks.
This will of course make it impossible to use backticks inside of a codeBlock,
which is a simplification we're going with here. Extending the rule to allow
for backticks within a codeBlock node is left as an exercise to the reader.
We can now extend our section rule to contain codeBlocks.
section: $ => seq(
  $.heading,
  repeat(
    choice(
      $.text,
      $.codeBlock,
    )
  ),
),
If you put this in and run it, you may be a bit surprised to see that the output
doesn't change from before. The syntax tree still consists of two sections
containing one heading and text each. This is because text is consuming
the backticks that should delimit a codeBlock. We'll address this at the same
time as we define our paragraphs in the next part.
Paragraphs with text and inline code
We want to define grammar rules such that the parser can recognize paragraphs
that are composed of one or more text and/or inlineCode nodes. The
inlineCode rule is quite simple: a backtick, followed by zero or more
characters that are anything but a backtick (i.e. codeText), followed by a
backtick.
inlineCode: $ => seq(
  '`',
  $.codeText,
  '`',
),
We also need to alter the text terminal to not allow backticks, because
otherwise it will just consume them like it did the # before. This will also
allow our codeBlock rule to actually consume something.
text: _ => /([^#`]|[^\n]#)+/,
Now we can define the paragraph non-terminal which, again, should be one or
more inlineCode or text.
paragraph: $ => repeat1(
  choice(
    $.inlineCode,
    $.text,
  ),
),
And then we update the section to repeat paragraph instead of text.
section: $ => seq(
  $.heading,
  repeat(
    choice(
      $.paragraph,
      $.codeBlock,
    )
  ),
),
We end up with the following rule set.
rules: {
  source_file: $ => repeat($.section),

  section: $ => seq(
    $.heading,
    repeat(
      choice(
        $.paragraph,
        $.codeBlock,
      )
    ),
  ),

  paragraph: $ => repeat1(
    choice(
      $.inlineCode,
      $.text,
    ),
  ),

  inlineCode: $ => seq(
    '`',
    $.codeText,
    '`',
  ),

  codeBlock: $ => seq(
    '```',
    $.codeText,
    '```',
  ),

  codeText: _ => /[^`]*/,

  heading: _ => /#.+/,

  text: _ => /([^#`]|[^\n]#)+/,
}
If you try this out, you'll find that it doesn't work, Tree-sitter won't even generate a parser for you. Instead, it complains about a conflict. Oh, dear.
Resolving a conflict in the grammar
A conflict in the grammar occurs when there are multiple ways for Tree-sitter
to interpret the rules you've provided it with. In the case of our paragraph
rule, Tree-sitter has the following to say.
$ npx tree-sitter generate
Unresolved conflict for symbol sequence:

  heading  paragraph_repeat1  •  '`'  …

Possible interpretations:

  1:  heading  (paragraph  paragraph_repeat1)  •  '`'  …
  2:  heading  (paragraph_repeat1  paragraph_repeat1  •  paragraph_repeat1)

Possible resolutions:

  1:  Specify a left or right associativity in `paragraph`
  2:  Add a conflict for these rules: `paragraph`
This is a little bit hard to interpret if you haven't worked a lot with parsers
before. The short of it is that our use of the paragraph rule is ambiguous due
to the paragraph being repeated in the section rule, and then is itself a
repetition. For example, how should the first paragraph of the first section be
parsed, as shown below, be parsed?
This little paragraph of text with `inline code`
Is it one paragraph containing text and inlineCode, i.e. (paragraph (text)
(inlineCode))? Or is it perhaps two paragraphs, one with the text and one
with the inlineCode, i.e. (paragraph (text)) and (paragraph (inlineCode))?
It's impossible to tell based on the rules we've defined.
To get rid of this ambiguity, we can use
associativity.
As associativity is a bit of a brain twister the first time around, we won't
bother trying to fully understand it here. We'll just try both and see what
happens. We can make a rule left- or right-associative by wrapping it in
prec.left() or prec.right(), respectively. Doing that in turn, we get the
following two parse results for this part of the tree.
; left-associative result
(paragraph (text))
(paragraph (inlineCode))
; right-associative result
(paragraph (text)
(inlineCode))
The right-associative version looks like what we sketched out before embarking down this road, so we'll adjust the rule accordingly.
paragraph: $ => prec.right(repeat1(
  choice(
    $.inlineCode,
    $.text,
  ),
)),
And with that, we can now create a syntax tree with a sufficient level of granularity to achieve the highlighting we set out to. If you generate the parser again and run it, you should see a tree like this.
(source_file [0, 0] - [13, 0]
  (section [0, 0] - [9, 3]
    (heading [0, 0] - [0, 19])
    (paragraph [0, 19] - [1, 48]
      (text [0, 19] - [1, 35])
      (inlineCode [1, 35] - [1, 48]
        (codeText [1, 36] - [1, 47])))
    (codeBlock [1, 48] - [9, 3]
      (codeText [3, 3] - [9, 0])))
  (section [9, 3] - [13, 0]
    (heading [9, 3] - [11, 25])
    (paragraph [11, 25] - [13, 0]
      (text [11, 25] - [13, 0]))))
We still only have a single highlight query, though, so next up is improving that.
Improving the highlight queries
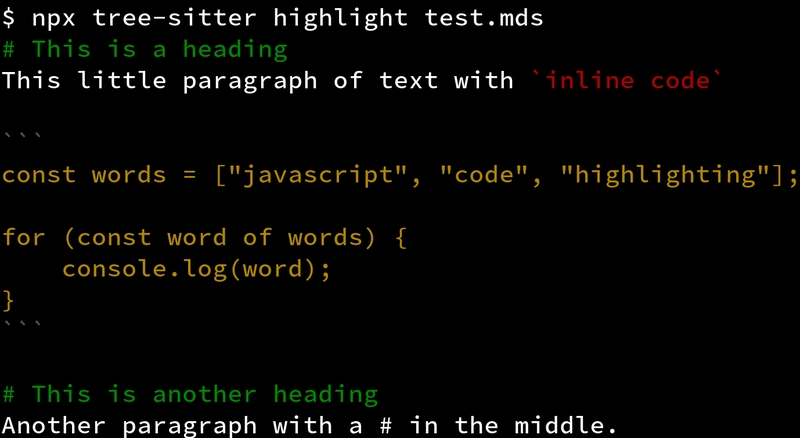
We now have a significantly more granular syntax tree to work with. As a first attempt, let's color inline code including backticks with one color, code block backticks with one color and finally the code blocks themselves with another color.
(heading) @string
(inlineCode) @property
(codeBlock) @punctuation.delimiter
(codeBlock (codeText) @module)
Here we have our first non-trivial use of queries, as we have two queries
referencing the same type of node: codeBlock. The first query marks the
entire codeBlock with @punctuation.delimiter, which is dark grey in my color
scheme. Then we mark codeText inside the codeBlock as a @module, which
is yellow in my color scheme. The latter query is more specific than the former,
and so takes precedence. The result is a significant improvement over our
starting point.
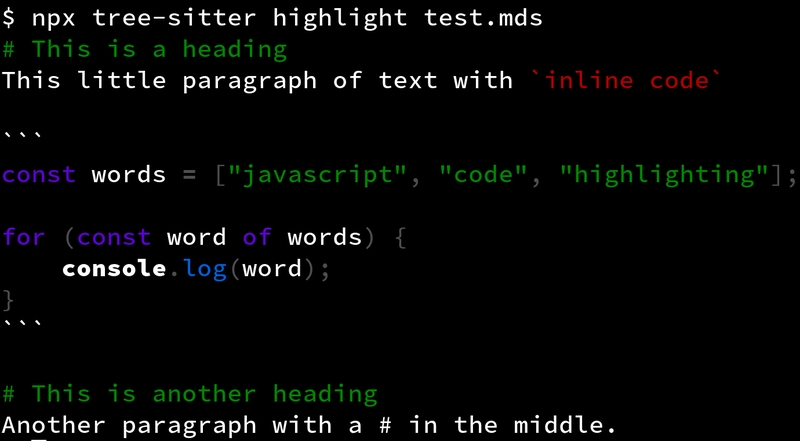
But it's still not great. Having yellow JavaScript code is a marginal improvement over just white code. This is where Tree-sitter's killer syntax highlighting feature comes into play: injections
Injecting a JavaScript parser
Injections are super cool. They allow us to succinctly state that certain nodes should be parsed with some other parser than the one we're currently using. Just like with highlights, injections are specified with queries. What makes this even cooler is that the author of some given parser doesn't need to have thought about this; you can tack it on afterwards due to queries being completely separate from the parser itself.
First of all, we need to extend our package.json with an injections key.
  "tree-sitter": [
    {
      "scope": "source.markdownsimple",
      "file-types": [
        "mds"
      ],
      "highlights": [
        "queries/highlights.scm"
      ],
      "injections": [
        "queries/injections.scm"
      ]
    }
  ],
Then we add a file at queries/injections.scm with the following query.
(((codeBlock (codeText) @injection.content))
  (#set! injection.language "javascript"))
Unfortunately, the highlight queries will interfere a bit with this injection,
so we also need to reduce our queries/highlights.scm file to the following.
(heading) @string
(inlineCode) @property
But with that change, highlighting is now a lot more interesting. Although, admittedly, the color scheme could definitely use some work.
With that, we've achieved the highlighting goals we set out to at the beginning of the article.
Summary
In this article, we explored the basics of Tree-sitter and how to apply it to
provide syntax highlighting for a simple markup language. The full source code
for the project can be found
in the companion repository.
There are still numerous shortcomings with this implementation, such as the fact
that codeBlocks cannot contain backticks, or that empty lines between
paragraphs don't actually produce multiple paragraphs in the syntax tree. But
the point of this article wasn't to produce a perfect Markdown Simple parser,
but rather illustrate some fundamental concepts of creating parsers with
Tree-sitter. And that, I think, has been achieved.
In the next part of this article series, we'll explore working with Tree-sitter in NeoVim!
The final versions of the grammar and queries are inlined below for your convenience.
// grammar.js
module.exports = grammar({
  name: 'markdownsimple',

  rules: {
    source_file: $ => repeat($.section),

    section: $ => seq(
      $.heading,
      repeat(
        choice(
          $.paragraph,
          $.codeBlock,
        )
      ),
    ),

    paragraph: $ => prec.right(repeat1(
      choice(
        $.inlineCode,
        $.text,
      ),
    )),

    inlineCode: $ => seq(
      '`',
      $.codeText,
      '`',
    ),

    codeBlock: $ => seq(
      '```',
      $.codeText,
      '```',
    ),

    codeText: _ => /[^`]*/,

    heading: _ => /#.+/,

    text: _ => /([^#`]|[^\n]#)+/,
  }
});
; queries/highlights.scm
(heading) @string
(inlineCode) @property
; queries/injections.scm
(((codeBlock (codeText) @injection.content))
    (#set! injection.language "javascript"))